

How To Draw A Realistic Raccoon
This stride by step tutorial shows how to draw a raccoon's confront from the front view going from a basic sketch to a fully shaded realistic looking drawing.
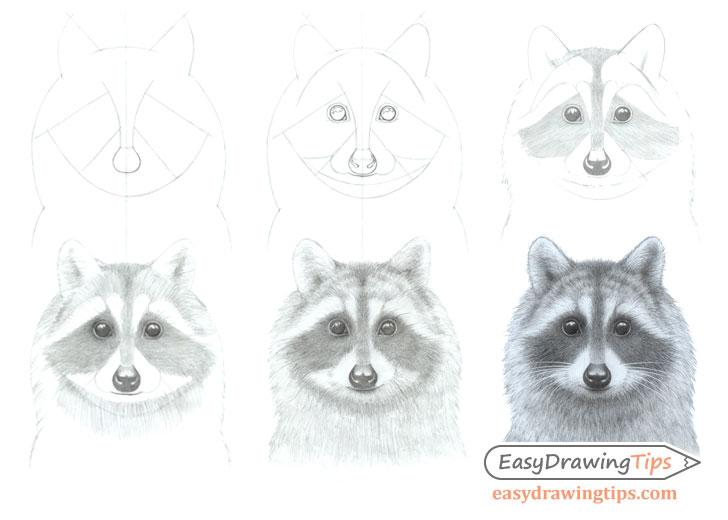
Stride one – Draw a Structure Line Shape of the Raccoon's Head
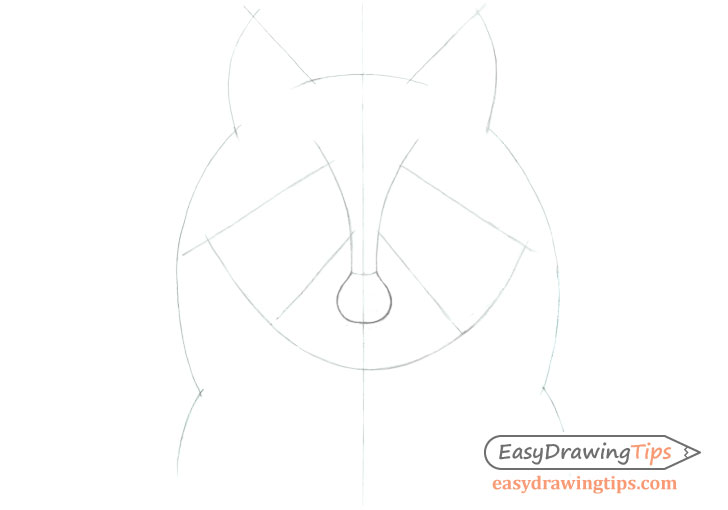
Before drawing any fauna its a good idea to have a look at their nigh defining feature. A raccoon's face has a very feature pattern with nighttime fur effectually the eyes that transitions towards the fur on their cheeks. Raccoons also have a adequately pointy snout, fluffy fur and ears that betoken upwards and slightly to the sides.
Start the cartoon with a highly simplified construction line sketch equally in the above example. Be sure to draw very lite lines that you tin easily erase later.
The goal is to create a sort of "framework" inside which you will so draw and shade.
The very first line y'all will want to draw is the center line that will help make sure that both halves of the raccoon'southward face are relatively even in width (does not accept to be perfect). Side by side depict the outer curve of the head followed by the shapes of the ears and the inner shapes.
Stride 2 – Make a Line Drawing of the Face
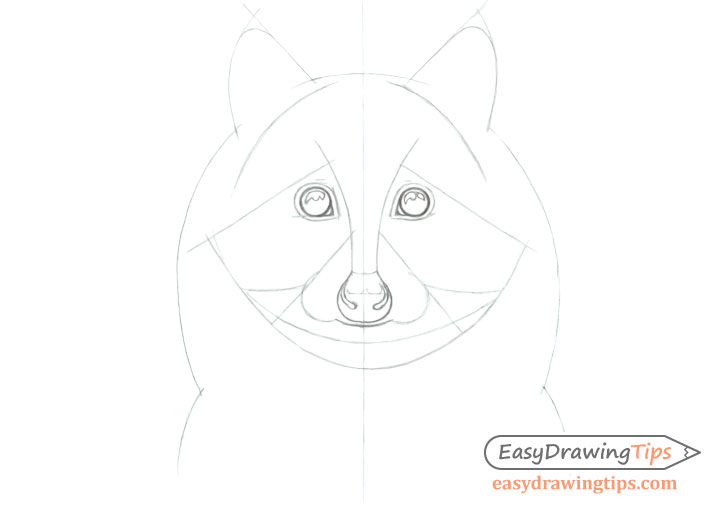
As mentioned in the previous step within the of the construction lien framework draw some of the smaller details of the head such as the eyes, oral fissure, and nose. Yous can as well circular off the ears and indicate the chin.
Raccoons generally take large pupils that cover the major visible area of the eyes so y'all can simply draw them every bit a prepare of circles. You lot can then add a pair of "pointy areas" at the inner lesser ends of each middle. Inside the optics outline the highlight areas and so you don't accidentally go over them when shading. Next you can outline the combined shapes of the circles and the pointy inner ends to create the eyelids.
Draw the nostrils curving upwardly and so inward. In this instance (as you will see in later on steps) the upper nose area will also have a highlight so indicate information technology's shape with a few calorie-free lines as well.
Draw the mouth with a small bend and add two shapes close to half circles to each side to aid define the snout.
You may notice that this line drawing still looks fairly abstruse simply in that location is no need to refine information technology further as we will do that with shading in the next 3 steps.
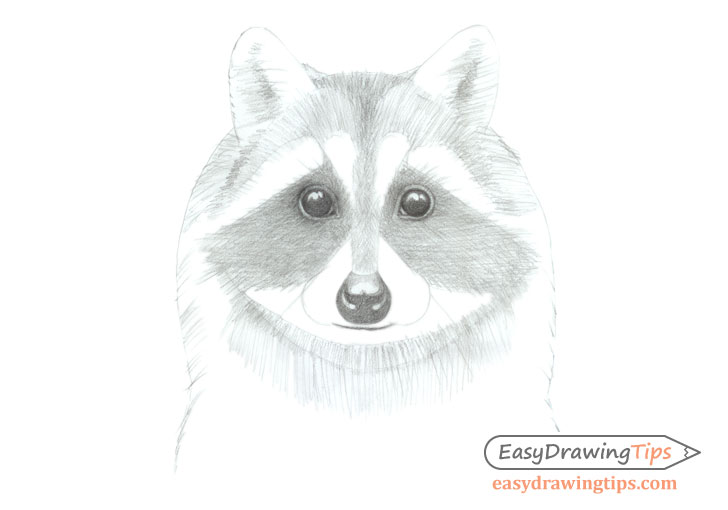
Step three – Begin Shading
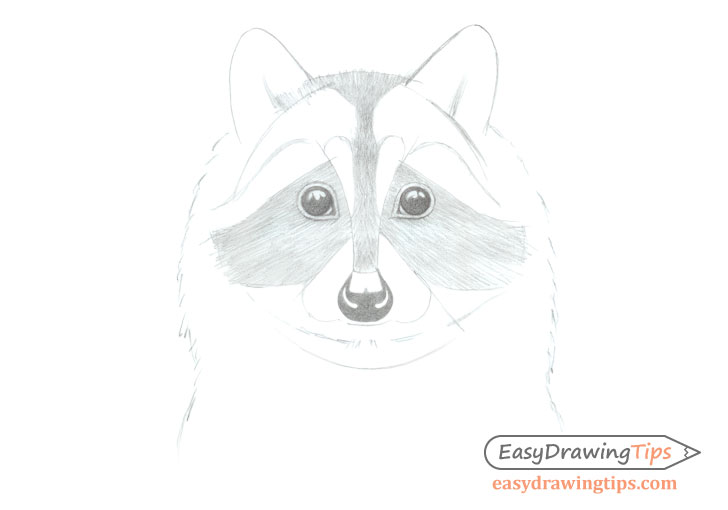
First the shading procedure past first filling in the optics and the olfactory organ. Leave the highlight areas white. In this example the inner nostril areas will likewise have highlights and so exit those white as well.
Next apply some basic strokes to the darker parts of the raccoons fur such as the areas around the eyes and the centre of the face. Attempt and make the strokes in the general direction of the fur.
For an explanation of different strokes types see:
Shading Techniques and Stroke Types Drawing Tutorial
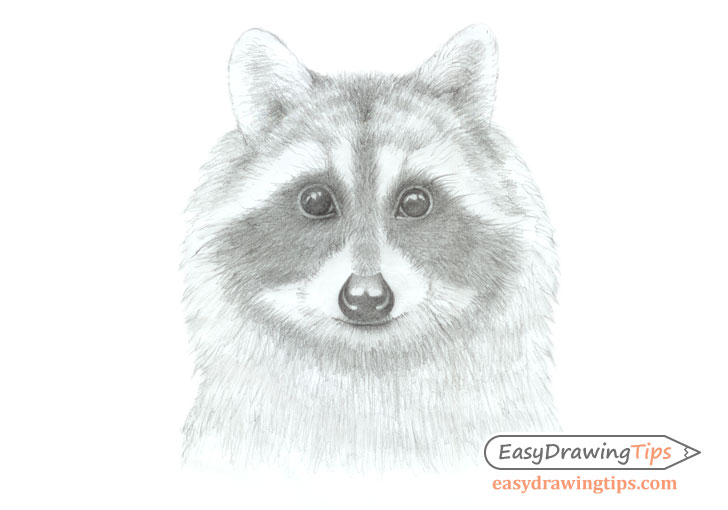
Footstep 4 – Continue Shading
For this tutorial nosotros are using very generalized lighting weather condition shading the areas that generally tend to be in the shadows in well-nigh normal lighting with low-cal coming from above. In this case the main "in shadow" areas will be below the chin and inside the ears. Shade this areas with darker strokes but non as dark as the black fur.
Y'all can likewise add some small fur patterns on the height of the raccoon's head which will be well-nigh as dark every bit some of "in shadow" areas.
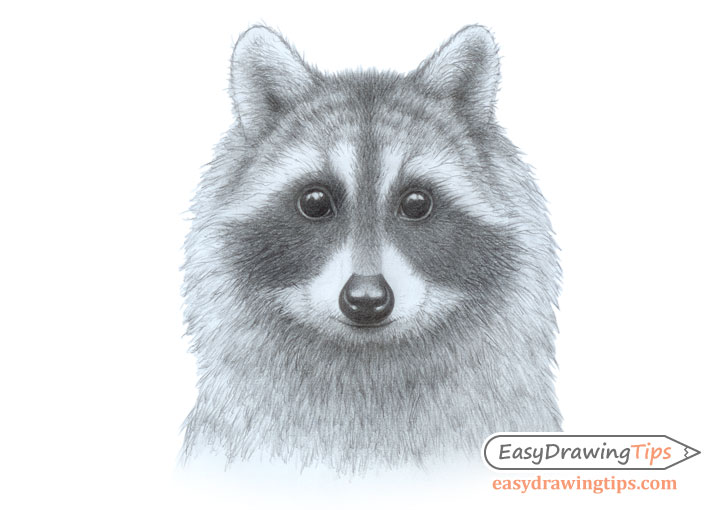
Stride 5 – Refine the Shading
At present finally use strokes to the lighter areas of the raccoon's head excluding the completely white areas of the fur. Again make the strokes in the direction of the fur.
You can also starting time refining the shading on the darkest parts of the fur by adding some small strokes that more closely mimic the look of actual fur. Try and make the strokes thicker towards the base and narrower towards the tips and so they await like individual hairs.
Stride 6 – Finish the Cartoon
This final stage will have some piece of work as you volition demand to do a lot of piddling strokes in order to imitate the raccoon's fur. You should as well utilize the stroke in a way that creates adequately shine gradient'due south from light to dark where appropriate.
Overall you will want to darken the shading but at the same time to be careful non to overdo information technology to the point where you tin can't see the individual strokes that create the fur pattern.
As you lot shade also be certain to compare the different areas of the drawing to ane another to insure you have enough contrast.
Optional Step – Adding the Whiskers
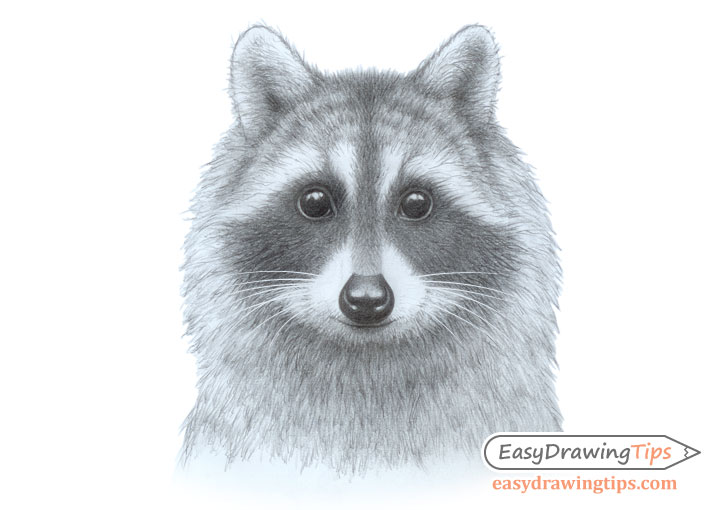
One thing that you may observe is missing course the offset drawing are the whiskers. The reason for that is that raccoons have white whiskers making information technology very difficult to add them in a pencil cartoon.
You could try and leave the area white simply that would brand shading the surrounding area very difficult and even more time consuming as yous would have to very carefully shade around them.
A better choice is to add the whiskers in after y'all finish shading either using white pigment or certain types of pencil crayons. You lot can also browse your drawing and add them in digitally if that'southward an option that's available to you. Alternatively you lot tin exit them out all together.
Determination
This is a fairly difficult tutorial due to all of the details of the fur and the need to balance between light and shadow as well as the color blueprint of the raccoons confront. If y'all like a challenge and would like to endeavour some more similar tutorials check out:
- How to Describe a Tiger Face up & Head Step by Step
- How to Depict an Owl's Confront & Head Step by Step

Source: https://www.easydrawingtips.com/how-to-draw-a-raccoon-face-step-by-step/
Posted by: puafrod1948.blogspot.com
0 Response to "How To Draw A Realistic Raccoon"
Post a Comment